Lubricating Dryer Idler Pulley Squeals Again
The Maytag Bravos clothes dryer started squealing and squeaking while drying clothes. I used the following procedure to set the problem. Follow along on this film guide if you lot are having like issues! I hope this can assist you if y'all are suffering from a really loud dryer…!
Background Data
This is a relatively simple repair. The reason information technology is squealing is that the bearings are starting to go bad in the guide wheels of the dryer drum. Replace those wheels, and the squealing will get away.
Note: If your dryer is "Screeching," this could be a different problem. The felt seal around the drum may take failed. Check out this post to set up a "metallic-on-metallic" screeching sound coming from your dryer!
This roller begetting repair takes a couple of hours one evening or on the weekend. Order the parts kit ahead of time, and accept the tools handy, and you won't have any problem finishing this repair in several hours, less if yous consider yourself handy.
The exact model of dryer shown in this guide is the Maytag Bravos Model# MEDB850WQ0. This repair and kit besides works for the Whirlpool Duet Model# WED8300SW0 (and WED8300SW1) with a few minor differences in taking off the front end console. In fact, information technology will work for most Whirlpool, Maytag (built after 2007), Kenmore and KitchenAid dryers as long as they have the door-mounted lint screen. This dryer has a 27-inch drum.
If you buy something through links on this site, I may earn an affiliate committee – at no cost to you.
Hither is a flick of the front panel of the dryer used in this repair guide in case it is helpful for identification purposes.

Parts Needed for this repair:
The link below is to the right replacement parts kit on Amazon. The role number is included as well, in instance yous want to expect for it somewhere else:
Whirlpool Model# 4392067RC Dryer Repair Kit
Tools Required for this repair:
- 5/16 in socket (or wrench)
- Flat screwdriver
- Metallic paint scraper
Replace the Bearings in the Dryer
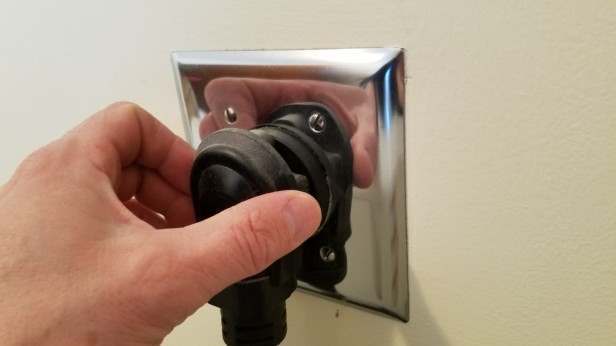
The first step is to unplug the unit.
Then you will want to flip up the summit of the dryer. In order to exist able to do that, pull it out a little way from the wall. Then press the clips to release the meridian using the pigment scraper.

Press in the 2 tabs using a thin metal pigment scraper to lift the top hat, as shown in the photograph below. There are 2 tabs, one on either side of the door.

This is a close-upward view of one of the metal tab (green) that yous are pressing inward to release the pinnacle lid.

After the lid is flipped up, you need to remove 2 screws on the behind of the forepart console, one on each side, with the 5/16th socket to take off the front panel. You can encounter the screw-head in the image below.

After the 2 screws are out, lift up on the front panel to unhitch it from the notches belongings it in place on the bottom.
This is a view of the dryer with the top flipped upward and the front console removed.

This is a close up view of the tabs on the bottom that the front end panel hitches in to.
Take off 6 more screws to remove inner front panel, and set information technology aside. There is one wiring harness that you lot can unplug if you desire to create more space to work, but information technology is not really necessary. Alternatively you can ready the inner forepart panel off to the side.

This is the inner front panel. Notice the wheel bearings. You will exist replacing those.
Now remove the drum and the belt.
Tip: Before y'all remove the drum and pulsate belt, study carefully how the chugalug is routed, so that you tin can remember how it goes when it comes fourth dimension to reassemble it.
Hither is a view of the style that the belt is routed around the tensioner and the pulsate.

Reach nether the exposed drum and press the tensioner arm to release the chugalug that is wrapped around the drum and the motor. It is relatively easy just to pull the belt off.
Note: The belt you want to remove is the one going effectually the drum (seen on the summit of the drum in the photo below), not the fan belt, leave that one in place. (That one is visible several photos later).

Elevator up on the drum to remove it, being careful non to harm the felt gasket around the drum.
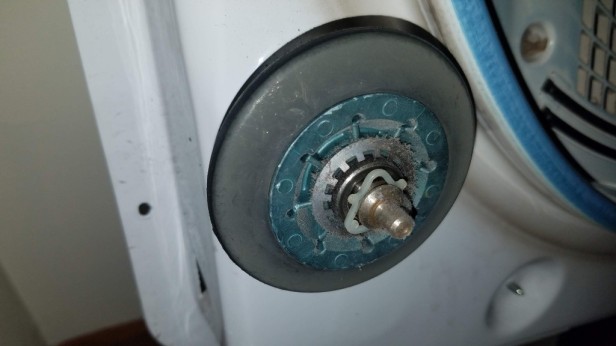
This is a close up view of the tensioner arm (with white plastic wheel attached to it), with the belt dangling, afterward the drum has been removed.

This is an first-class opportunity to vacuum out the grit and lint that has accumulated!
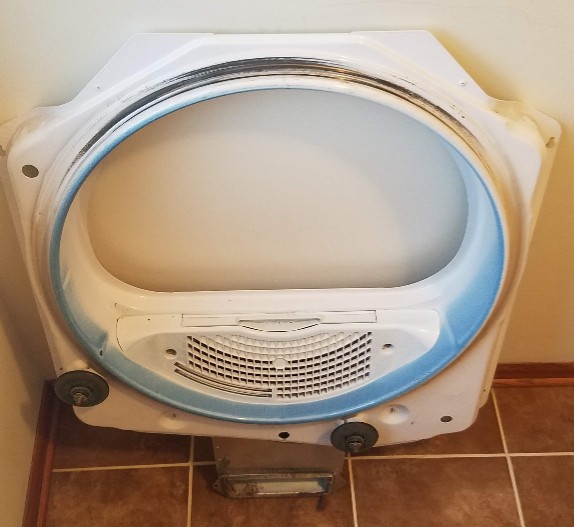
This is a view with the drum and pulsate chugalug removed.

At present you volition take the repair kit and supplant the 4 wheels (they look like Rollerblade wheels).
The repair kit consists of the following items:
Whirlpool Model# 4392067RC Dryer Repair Kit
Take off all the wheels. To do this, utilise a flat screwdriver to pry off the triangular plastic clips holding them in place.
Clean off the blackness stuff that has undoubtedly accumulated on the bike shafts, then put on the new wheels, and slide the plastic clips back on to concord the wheels in identify.
Note: The first time I did this repair, I didn't have the repair kit, then I merely took of the wheels, cleaned them and the shafts, and reassembled the dryer, only the dryer still squealed! The second time I did the repair, I replaced the wheels, and the squealing has at present stopped. The dryer has been quiet now for two years four years (update July 2020) since this repair was washed.
It is not necessary to lubricate the wheels. The bearings are already pre-lubricated.
You lot want the wheels to spin one-2 turns when you requite them a whirl.
Also replace the white plastic tensioner wheel.

Now, put the belt around the drum and elevator it into place and set information technology back onto the wheels. Brand certain that the felt gasket is non folded under, and is even effectually the circumference of the drum.
Then attain nether the drum and feed the belt around the motor and the tensioner arm.
Reassemble the 2 front end panels in the reverse gild that you took them off.
Plug in the unit and requite it a attempt.
I hope this fixed your problem. This is quite a elementary repair that requires very few tools. For more information, cheque out the repair kit on Amazon:
Whirlpool Model# 4392067RC Dryer Repair Kit
I hope you establish this helpful! If then, please let me know near it in the comments section below!
Would you characterize your dryer equally "Screeching" instead of "Squealing"? (Subtle difference, I know!) So you may take a failed dryer seal! Bank check this out:
Picture Guide on How to Gear up a Screeching Dryer
Having issues with your Maytag Bravos Washing Car, too? Does information technology sound very loud, like a jet engine? Check out this post for the procedure to supersede the bearings in your washer!
How to Supervene upon the Bearings in a VERY Noisy Washing Machine – Maytag Bravos Washer
Source: https://practicalmechanic.com/2018/03/26/how-to-fix-a-squealing-dryer-maytag-bravos/
0 Response to "Lubricating Dryer Idler Pulley Squeals Again"
Post a Comment